Yummy Denmark: Kanelsnegle

When I think back to the first couple of times I came to Denmark back in 2011 to visit the viking boyfriend, who at that time technically seen wasn’t even my boyfriend yet, I guess, but that’s a different story… where was I? Ah yes, the first couple of times I was in Denmark, there was something I associated with Denmark more than anything else (more than the flags everywhere, even more than hotdogs!), and that was the unmistakeable, soft smell of cinnamon that tickles your nose every time you walk past a 7Eleven store. I should explain that we didn’t have them back then in Germany (don’t think they do now), and they are virtually at every street corner in Copenhagen. Seriously, it is impossible to walk through Copenhagen for more than 10 minutes and NOT see a 7Eleven. That’s particularly practical for when you’re out partying and desperately craving a hotdog for “natmad” at 3am, but again, different story.

To this day, walking past a 7Eleven and catching that sweet cinnamon smell, it feels like I just came here for the first time. Ah, nostalgia…

Classic kanelsnegle with sugar glaze

Kanelsnegle, or cinnamon rolls, are a very popular Danish bakery good or dessert. You can buy them everywhere. Even the supermarkets with their fresh baked goods sections have all sorts of them. I think the very first kanelsnegle I had was probably either from a 7Eleven or from the Netto store across the street from the boyfriend’s apartment at that time.

The classic version has a sweet icing on top, as in the picture above, but you can find varieties with chocolate as well (chocolate and cinnamon - what’s not to love?).

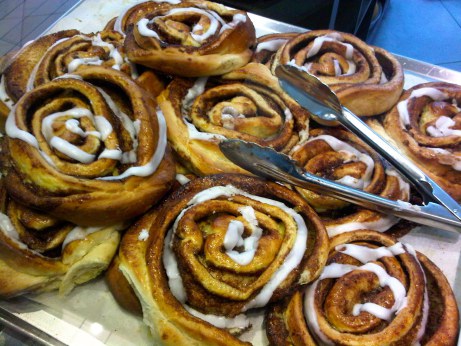
Yum, look at all these delicious kanelsnegle at Lagkagehuset!

They are usually made with yeast dough - an English recipe can be found on this blog called My Danish Kitchen - as well as tons of butter, sugar and of course cinnamon.

So tonight, I was (a) craving something sweet for dessert and (b) wanting to bake something for my boyfriend to take to his grandma today when he goes to visit her in Jylland, but (c) feeling quite lazy, so instead of making a yeast dough myself, I resorted to buying pre-made puff pastry and making a batch of cute mini kanelsnegle.

separator

Quick and easy kanelsnegle

1 package of puff pastry (pre-made and rolled up)

ca. 125g unsalted butter, room temperature

2 tbsp. brown sugar

2 tbsp. cinnamon

1 egg

Roll out the pastry and spread with a thin layer of butter. Leave out about 2cm at a short end. Sprinkle on brown sugar and cinnamon evenly. Carefully roll up, put some water on the edge of the dough so it sticks together when the roll “closes”. Cut into approx. 1,5cm pieces and put on a baking sheet. Whisk up the egg with 1 tbsp water and brush over the tops of the snegle. Bake for about 15mins (or until golden brown) at 200°C. Take the snegle out of the oven and let them cool. For the glaze, mix about 4 tsp powdered sugar with about 1 tsp milk (be careful not to use too much milk, because the glaze should be nice and thick!) and brush generously over the snegle.

separator

Did they turn out as beautiful as the ones in the pictures above? No, they did not. In fact, some came up quite weird during baking. But they are adorable and cute, and they are SO delicious!! I’m honestly considering eating them all by myself right here and right now, and pretending I forgot that I promised to bake something for tomorrow…

WP_20140110_0042014011021123820140110211335

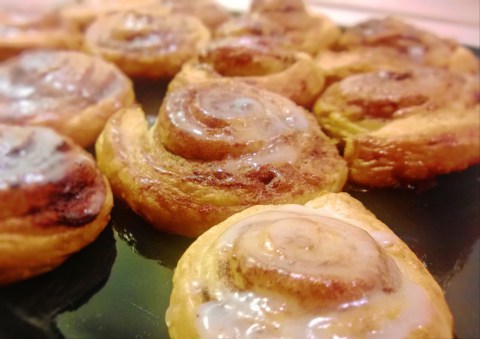
Result: adorable little kanelsnegle!

Bottom line, you should get yourself some kanelsnegle right now! Quickly, before the EU regulates them away - see here for one of the biggest news stories last fall. Or, even better, make your own cute mini snegle with the recipe above. Added bonus: you can put in as much cinnamon as you want PLUS your apartment will smell AMAZING.

Happy weekend!

Christmas Decoration DIY: Silver sparkly reindeer on canvas

Vielleicht liegt es an der Jahreszeit, aber momentan liebe ich einfach alles, was ein Geweih hat. Und wenn es dann dazu noch silbern ist und/ oder glitzert, dann bin ich auf jeden Fall Feuer und Flamme!

Auf Pinterest bin ich dann auf diese weihnachtliche Deko-Idee gestoßen (auf das Bild klicken für den Original-Blogpost):

Geweih, Silber, Glitzer - der Plan war gefasst! Ich besorgte also schon vor längerer Zeit alle benötigten Utensilien, aber gestern hatte ich endlich die Zeit und Muße, das Projekt in Angriff zu nehmen.


separator

I don’t know if it’s the season, but currently I’m a sucker for anything with antlers. And if it’s silver and/ or sparkly as well, I’m completely sold! So when I came across this DIY decoration idea on Pinterest, it didn’t take long for me to decide that I was going to make my own. I had already bought everything I’d need a couple of weeks ago, but yesterday I finally got around to actually making it.

separator

Material: eine Leinwand (ich habe mich für 40x40cm entschieden), Universalkleber (flüssig, am besten mit einer recht dünnen Dosierspitze), silber- oder goldfarbener Glitter zum Streuen (jede andere Farbe geht natürlich auch), schmaler Pinsel, Bleistift.

Material: canvas (mine was 40x40cm), universal glue (make sure it has a thin tip), glitter in silver, gold or any other color you like, a brush and pencil.

WP_20131220_002

Als nächstes musste natürlich die Silhouette ausgewählt werden. Diese habe ich dann in der gewünschten Größe ausgedruckt.

Next, select the deer silhouette you want to use and print it in the desired size.

WP_20131220_004

Die Silhouette ausschneiden und nach Bedarf zusammenkleben, um sie als Schablone nutzen zu können. Anschließend mit einem Bleistift die Umrisse auf die Leinwand übertragen.

Cut out the silhouette and tape together, if necessary, to use as a stencil. Trace the shape of the deer silhouette on the canvas with a pencil.

WP_20131220_008

Nun mit dem Kleber vorsichtig die Umrisse ausfüllen. Dabei darauf achten, dass die Bleistiftränder nicht mehr zu sehen sind. Anschließend den Glitter großzügig aufstreuen.

Fill in the silhouette with the glue, making sure that the pencil frame is not visible any more. Generously apply glitter.

WP_20131220_009

Entsprechend der Anweisungen auf dem Kleber trocknen lassen. Nach dem vollständigen Trocknen den überschüssigen Glitter abschütteln und gegebenenfalls die Ränder begradigen. Tipp: Zum Schluss mit etwas Haarspray fixieren.

Let dry following instructions on glue bottle. After it has dried completely, shake off any excess glitter and clean the edges, if necessary. Tipp: Apply a thin layer of hair spray to hold glitter in place.

WP_20131220_010(vor dem Trocknen/ before drying)

Homemade Christmas gift idea: Cranberry syrup

Kochen und Backen sind ja schon seit längerem unter meinen Hobbies zu finden, aber in den letzten Monaten bin ich auch immer mehr unter die Selber-Macher gegangen. Marmeladen, Apfelmus, Chutneys, Pesto - und jetzt eben auch Sirup. Cranberries gehören in die Herbst- und Winterzeit wie Mandarinen und Walnüsse. Bereits zu Thanksgiving habe ich diesen Sirup hergestellt, um ihn im Apéritif zu verwenden (dazu einfach etwas Sirup mit Champagner, Sekt, Prosecco oder Weißwein aufgießen, eventuell mit einer halben Orangenscheibe garnieren). Er eignet sich aber ganz genauso hervorragend über Vanilleeis oder zu anderen Desserts, oder für die Zubereitung von Cocktails. In hübsche Flaschen abgefüllt macht er sich also ganz wunderbar unterm Weihnachtsbaum. Die Step-by-Step-Anleitung findet Ihr hier! separator

Cooking and baking have been some of my favorite things to do for quite a while now, but recently I’ve also begun making other things on my own, such as jam, apple sauce, chutneys, pesto etc. And then, for Thanksgiving, I decided to make a cranberry syrup to use in my welcome drink (it’s an adaptation of a Kir Royal: simply mix a bit of syrup with champagne, prosecco or white wine and garnish with an orange slice), but this syrup is also a great addition to vanilla ice cream or other desserts, or can be used in cocktails. Therefore, it’s a wonderful Christmas gift. You can find the step-by-step instructions below!

separator

Homemade Cranberry Syrup

WP_20131126_003[1]

Step 1

500g Cranberries, 250g Zucker und 300ml Wasser in einen großen Topf geben und zum Kochen bringen.

In a large pot, combine 1 pound of cranberries, 250g granulated sugar and 300ml water and bring to a boil.

WP_20131126_005[1]

Step 2

Bei mittlerer Hitze solange kochen lassen, bis der Zucker vollständig aufgelöst ist - Achtung, die Cranberrys platzen auf (Spritzgefahr!). Unter ständigem Rühren ca. 10-15min weiterköcheln.

Let simmer on medium heat, constantly stirring, until sugar is dissolved - careful, cranberries will pop open! Simmer for about 10-15mins.


WP_20131126_008[1]

Step 3

Die Masse in ein feines Sieb geben und vorsichtig durchstreichen, bis so viel Flüssigkeit wie möglich durchgelaufen ist (Cranberry-Reste können anderweitig verwendet werden, z.B. als Brotaufstrich).

Strain the cranberries through a fine sieve until as much as possible of the fluid has been removed. Keep solids for another use (e.g. bread spread).

WP_20131126_010[1]

Step 4

Den Saft einer Zitrone auspressen und unter den Sirup rühren. Danach vollständig abkühlen lassen und in Flaschen abfüllen (ergibt ca. 350-400ml).

Squeeze out the juice of one lemon and stir into the syrup. Let cool completely and fill into bottles (yields about 350-400ml of syrup).

WP_20131126_014[1]

Step 5

Etikettieren und verschenken oder einfach selbst genießen!

Add a pretty label and give away as a Christmas gift or enjoy yourself!